Sunday, April 24, 2011

Natural Easter Eggs

OK, I KNOW it is not at all related to the ACTUAL reason we celebrate Easter, but I LOVE decorating Easter Eggs each year. This year are a bit tight with money, and I have been working hard all week on reading, writing and math with the kids in school, so I thought it was time for a little science!
 
So, out came the natural dyes! We tried Red Cabbage, Oranges Peels (I had even made myself fresh OJ in the morning so I had peels in the trash just waiting for us!), Spinach and Tea.

We started the dyes all boiling (and next time I should remember to take pictures BEFORE the pots start steaming...) then went to work decorating.

First we used rubber bands to make stripes and lines on some of our eggs.

Then we used flowers and leaves to make interesting imprints. We used sections of old pantyhose to tie hold the natural stamps in place.

This flower art was MUCH harder than any of the how tos I read said it would be, but I think the end product is pretty cool. (I know, this picture is out of order, but I wanted to show you what the heck I was talking about!)

Next came the dying part. Nathaniel could have stood there and watched them "turn colors" all night if I had let him! Which was cracking me up, since you really could NOT see anything, but he had fun. The directions I read said to let them soak for 20 minutes to a half an hour, but I didn't like the depth of color after that short of time, so we just let them set all night in the dyes!

These are the ones done in Orange Peels... very subtle coloring.

These were done in the Spinach. I especially liked where the flowers and leaves gave different dimensions of color on these eggs.

These were the ones dyed in Red Cabbage.... interesting how they came out a blue color hu?

And these were the Tea Dyed eggs. The truest color compared to food used I think :)

Over all a fun and interesting project for the kids to learn from.

I did notice that the Easter Bunny needed to be more careful when hiding these eggs... they sure did blend in well to the plants and grasses in the yard!

What silly or fun traditions do you like to do with your family?
Easter Cookies

I found THIS cool looking idea in my reading and thought it would be fun to try with my kiddos.

First we actually went SHOPPING for the ingredients... now if you know me at all, you know that this is a SPECIAL project if I actually went out and bought things for it! I did know that I wanted Brianna to help with it, and so we went in quest of gluten free Easter Candy...... Who would have thought that would be SO HARD to find??? The Cadbury Eggs? No problem, they were fine, but the rest??? Yea... after at least 30 minutes of reading candy labels in the grocery store (not the easiest thing with two little ones wanting all the candy) we found Jolly Rancher Jelly Beans... yup, that is it, after 30 minutes! Dang....

Next up, mixing the dough. We made it in two batches, gluten free and regular. Not that we mind eating her cookies, but the gluten free flour is EXPENSIVE and we knew that we wanted to give some of these treasures as gifts, so we made them both ways. Sorry, no pictures of this step.

Then there were LOTS of Mini Cadbury Eggs to open... with an attitude, obviously!

Next up we shaped the dough around the eggs and put them in the mini muffin trays to bake (note to self, must buy another mini muffin tray before attempting this project again, one is NOT sufficient!)

While the cookies were baking and cooling we made "Easter Baskets" to hold some of them. We knew that we wanted to give some as gifts and we thought this would be a cute and easy way to do so. I found that check boxes were the perfect size, and one sheet of 12x12 scrap booking paper covered that size very nicely. So we:

*Centered check box on 12x12 scrap book paper and tacked down with double sided tape.
*Cut corners off of paper (saved corners to make little gifts cards to go with the presents!)
*Wrapped sides up and secured with tape.

Perfect gift containers for our cookies!

After the boxes were covered, the cookies cooled and taken out of the muffin trays, then it was time to decorate them. The FUN part you know? Yes, the girls did have lots of fun decorating (and sneaking candy too, as clearly caught on camera!).

I think that they came out super cute, and gloriously yummy!

And I also think that many of our friends and family will enjoy receiving their Easter treats from the kids!

The only bummer in the whole project was that Nathaniel was on a kick and would NOT partricipate.... so it ended up being a girl project. Not exactly what I had planned, but we all had fun anyways.

If you want to attempt this project with your family here is the recipe:

Easter Egg Hunt Cookies (filled with goodness!)

Ingredients

· 2 ½ cups flour (when using gluten free flour add 1/2 Cup!)
· 1 teaspoon baking soda
· 1 teaspoon salt
· 1 cup Crisco (I used 1/2 cup Crisco and 1/2 cup butter)
· ¾ cup white sugar (we used Splenda)
· ¾ cup brown sugar (we used Splenda brown sugar)
· 1 teaspoon vanilla
· 2 large eggs
· 24 mini Cadbury Eggs (the Carmel ones worked well too!)

Optional:
· Green frosting
· Jelly beans or M&Ms

Directions
1. Preheat oven to 350

2. Cream Crisco/butter, white and brown sugars, and vanilla in the bowl of your mixer. Add eggs one at a time.

3. In a separate bowl combine flour, baking soda, and salt. Gradually add flour mixture to wet ingredients. The dough will start to pull away from the bowl of the mixer.

4. Using about a tablespoon of dough wrap a mini Cadbury egg so it is completely covered. Place the cookie inside a greased mini muffin tin
 
5. Bake at 350 for about 9 minutes or until golden. ***IMPORTANT*** Let the cookies cool in the pan for about 10-12 minutes until you can “twist” it out. Using your fingertips gently try to twist the cookie to remove it. If the cookie seems too soft like it will break apart wait 2 minutes and try again. If your muffin tin is greased the cookie will lift out whole after about 10-12 minutes. But do not let your cookie cool completely in the tin or it may adhere itself to the pan and then you will have to scrape it out.
 
6. Let cookies cool completely, top with frosting and jelly beans or M&Ms.
 
Share your yummy goodness!!!

Saturday, April 23, 2011

Dancing Treats

Audrey and Josie used to dance ALL THE TIME and they LOVED being involved in our local dance studio, but then the studio in our town closed, and the studios in surrounding towns are so much more expensive so we have not been able to re enroll them anywhere. Audrey has been missing dance BIG TIME and begs me often to go to classes again, but it just is not in the financial plan right now.

Well, one of the agencies we work with offered a free two day class last weekend, so I quickly signed Audrey up as a special treat. Her brother's care and medical bills are just so high, I hardly ever have money to do treats with her, so even though the timing was awful for me, I made this class work for her. Saturday she was the ONLY one who showed up! So she got a one on one class, which was cool. But I was really impressed with the studio and rates at the studio (I had never heard of this place in all of my researching), so we invited Josie to come with us on Sunday so she could check it out too.
Saturday I was not able to hang out and watch Audrey, but I was able to be there all day Sunday. It was so good to see the girls dancing in a studio setting again!

Notice the difference in the girls? Yea, 7 years age difference! But I felt like this teacher did a GREAT job of teaching to both levels at the same time!

The girls had lots of fun and big smiles on their faces the whole time!
I though the picture of them stretching was just too fun... they all look like little pretzels on the floor!

And another awesome part??? They had brother hang out places too! There was a homework section where he could do homework if he had it, and a huge TV with Wii and Mario Cart.... Nat was in HEAVEN the whole class long!

It was a great experience for all of us!

And since it has been a LONG TIME sine I have shared videos of the girls dancing, here you go!

Keep in mind that they learned this in just 2 hours AND the teacher was teaching to both levels at the same time!

And the second one I got before my battery died....
This one you can see Audrey in MUCH better too...

Like I said ... it was so great to get Audrey back in dance, now I just have to figure out how to squeeze an extra $50-100 out of the monthly budget so I can get her back in dance regularly..... I WISH their father would start paying child support again so we could do this little things, it takes every penny I earn to live on!

Oh well, focusing on the fact that we found somewhere affordable to dance and are ready to go as soon as God shows us where the money can come from!

Friday, April 22, 2011

Read All Day....

Every one in a while Nathaniel's class does a read all day day....

They get to bring their blankets, stuffed animals and favorite books....

Then they chill out and read....

All day long....

I think it is the BEST idea ever!

 
Watching friends read together, share their books and interests, and learn that reading is FUN!

I really like this kid.... notice the shoes NEXT to him, not on his feet!

I love this idea so much I went in to take pictures of the recent read all day day for the year book, but thought that they were so sweet I would share them here too!

Nat and his best bud reading together.... pretty cool hu?

I wish more teachers just let thekids read and learn in fun ways like this!

What do your teachers do that you love?
What memories from school do you treasure?

Monday, April 18, 2011

My Favorite Place

Today was the first day of spring break....
A TWO WEEK Spring Break for us!

It was good in many ways, but it was hard in some ways too. So I decided I was brain dead tonight and needed an easy night to relax. When I was thinking of easy and relaxing I remembered these pictures that I took a few weeks ago and never had time to edit or share, so I thought they might be nice tonight (plus who doesn't need more room on their memory card??)

It was a blustery and stormy day... 
And I was in a MOOD.....
 So I took my camera ....
 And headed to my favorite thinking spot.
 I mean LOOK at this place....
 The beauty....
 The splendor....
 The colors....
 The power....
 The constant refreshing....
Who couldn't get in a better mood by visiting this place???
 I did get a little fixated on this tree....
I must have taken about 20 pictures of it!
And then editing it was just so much fun too!
Please excuse my fetishes :)
Is it me, or does the road in even seem a bit magical?
 Ahh.... God has SUCH a creative imagination!
And I for one am SO thankful He is such a great artist!
I hope you liked a little picture tour through my favorite spot.
Going that day put me in a better place, and editing tonight did the same!
 Where do you go and what do you do when you need an attitude adjustment or some down time?


Mad Baseball Skills!

Which I am told translates to:
"Great baseball skills!"

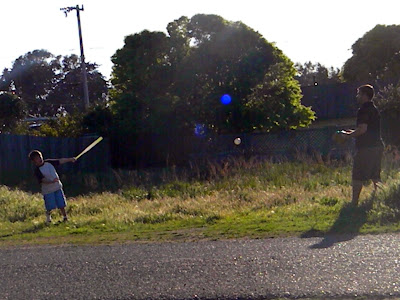
Nathaniel informed me that Reb is "wicked good" at playing baseball with him....

I think I am going to just assume that is a good thing!

Nathaniel on the other hand.....

Is blowing my mind with how good he has gotten!

He hits almost anything!

His eye hand coordination and timing is amazing!

The new patients he has makes it so much fun to watch him play baseball (and many other things too!)

I am so glad we have a field across the street for the kids to play baseball in whenever they want! Even if the sun is in a funny angle and makes my pictures weird!

Wonder who will play for hours on end with Nathaniel once Reb is no longer working with us......